Mango9 Builder Studio
Quick start
Create your first project, follow the build, and request the next improvement.
You do not need to know how to code. Start with a real person, a real task, and the smallest version that would already be useful.
The first version is a working conversation starter, not a lifetime commitment. It should let someone complete the central task from beginning to end so you can judge the product with something real in front of you. Features that do not help prove that task can wait for a focused follow-up.
Before you type, finish this sentence: “This app will help ___ do ___ without ___.” That simple sentence often reveals the user, outcome, and frustration Mango9 needs to understand.
Example: “This app will help a salon owner manage daily appointments without searching through texts and paper notes.”
Step 1: Write the first request
Tell Mango9:
- who will use the app;
- what they need to do;
- what information the app should keep;
- how it should feel;
- what can wait until later.
Write the request as if you are showing a new teammate how the business works. Use the terms your users already know. If “job,” “case,” and “ticket” mean different things in your business, choose the correct word now so the first app feels natural.
You can mention later ideas without asking to build them. A sentence such as “online payment can wait” protects the first version from growing too broad and tells Mango9 what not to prioritize yet.
Example: “Build a delivery tracker for our dispatch team. We need drivers, stops, delivery status, and proof-of-delivery notes. Customers do not need accounts yet, and route optimization can wait.”
Try a request like this
Build an internal CRM for a five-person sales team. It needs contacts,
companies, a deal pipeline, follow-up tasks, and a simple dashboard.
Use a clean professional design that works well on a phone. Customers do
not need their own login yet.
Step 2: Use the composer
The composer is where you combine the request with any useful context. Choose Build because you want a new app, attach only references that clarify the outcome, and review the selected model and style before sending. You can still adjust the request until you press the arrow.
An attachment does not explain itself. Add one sentence about why it matters: whether it contains approved wording, demonstrates a layout, shows a defect, or supplies an asset. This keeps a visual reference from accidentally replacing choices you already made.
Example: “The attached menu is our real service list. Use its names and prices, but create a new mobile-friendly design.”
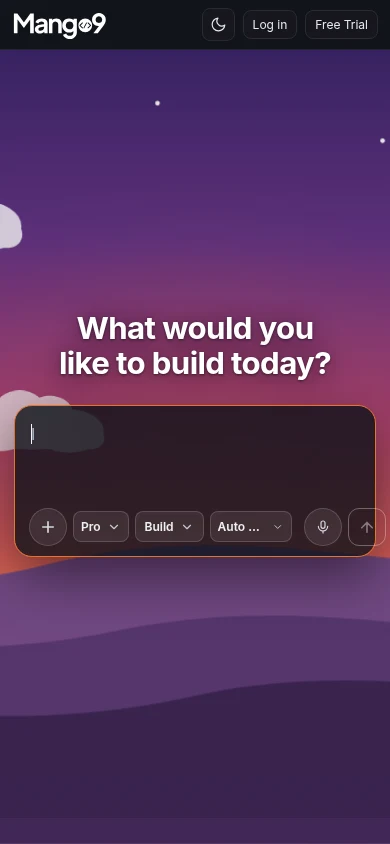
Type the outcome in the large box. Build is the correct mode for creating or changing an app.
Attach an image or document that clarifies the request. Add a sentence explaining whether it is approved content, a design reference, a real asset, or evidence of a defect. Choose the available level that fits the work. The default is a good starting point; use a deeper level when the request genuinely needs broader reasoning or difficult repair work. Ask returns discussion or explanation without intentionally changing the project. Build authorizes Mango9 to create or change the development app and save the completed result. Let Mango9 choose a fitting visual direction from the product goal, or select a style when you already have a preference. Your prompt can still preserve colors, wording, features, and existing layouts. Speak the request when that is more convenient than typing. Review the transcribed text before sending so names, numbers, and business terms are correct. Send the reviewed request. While work is active, the arrow becomes Stop; Stop ends the current turn and should be used only when you no longer want it to continue.
Step 3: Make the important choices
A new app may ask a few short questions. These are not technical questions. They make sure Mango9 understands the people, workflow, records, access, and visual direction before building.
Choose every answer that is genuinely required when the question allows more than one. Prefer the recommended choice when it matches your goal, but do not leave out another necessary user or workflow merely because one option is highlighted. Use the custom answer when the available choices miss an important business detail.
The saved choices become part of the working Brief. They help later builds remember the product direction, so answer for the app you actually want rather than for what sounds most advanced.
Example: For a clinic portal, the primary users may be both reception staff and clinicians. Select both when each group needs a real first-release workflow.
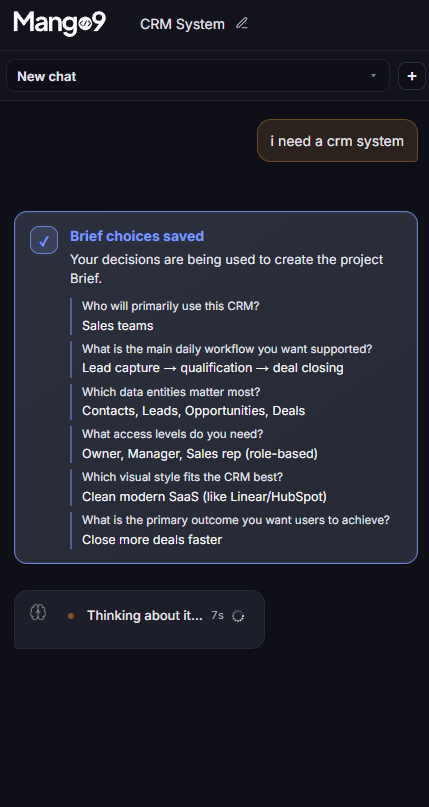
After the choices are saved, Mango9 creates the working Brief and starts the first build.
Pick what people need on day one. Reports, automations, extra roles, and integrations can be added in focused follow-up builds.
Step 4: Follow the build
Chat shows short progress updates. Preview may refresh as the app changes. You can let the build continue even when there is a quiet stretch; the final completion card is the clear handoff.
Progress messages describe work in motion. They may mention a page before every related check is complete, so treat them as useful orientation rather than a final promise. The build is ready for your review when the completion card appears and the active Stop control has returned to the normal send arrow.
Example: If Chat says the customer form is taking shape, wait for the completed result before submitting “fix the customer form.” The current build may still be finishing that exact work.
Step 5: Read the completion card
Start with the outcome sentence, then look at visual proof and the saved version. The card tells you whether changes were applied, whether the result is live in development Preview, and which version you can inspect or restore. If the result needs another pass, use this evidence to write one specific follow-up.
Example: The desktop proof looks right, but the mobile proof shows a crowded header. Your next request can say, “Keep the completed desktop design and reduce only the mobile header to the logo and menu button.”
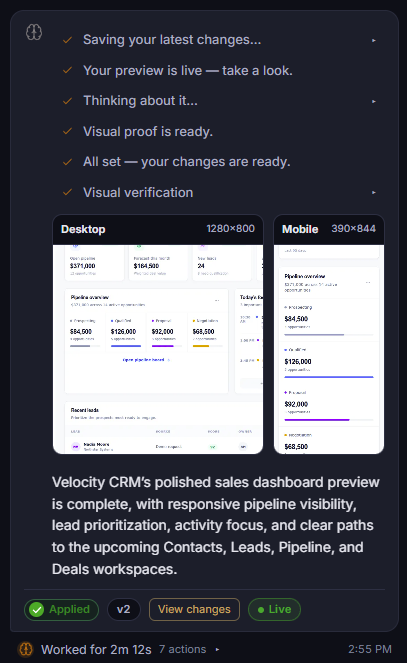
The completion card tells you what happened, shows visual proof, and gives you the saved-version controls.
The turn produced useful durable project changes. Review the summary and Preview to confirm those changes satisfy the business outcome. This badge identifies the durable version created by the completed build. Use the version number when comparing results or asking support about a specific state. Open the readable file-and-line summary for this version. It proves the scope of saved work, while Preview proves how that work behaves for a user. This is the version currently shown in the development Preview. It does not mean customers have received it; production changes only through Publish.
Step 6: Try it like a user
Open the main pages, press the important buttons, and switch between desktop and mobile. Then ask for one coherent improvement.
Use realistic sample information rather than only looking at the empty layout. Long names, several records, a missing optional field, and a permission boundary often reveal issues that a perfect example hides. Test the path that matters most before exploring secondary pages.
Example: In a CRM, create a lead with a long company name, move it to the next pipeline stage, add a follow-up task, and reopen the record. That is stronger proof than confirming the dashboard merely looks polished.
A useful follow-up
On the mobile contacts page, keep the search bar visible and turn each
contact into a compact one-line row. Keep the desktop page unchanged.
Start in Studio Learn better prompting