Mango9 Builder Studio
Mobile Apps
Design, test, secure, version, build, and distribute iOS and Android apps from the same Mango9 project.
Mango9 gives a project a dedicated mobile workspace without separating it from the product you are already building. Web and mobile share the project, conversation, product knowledge, backend, and secure settings, while the mobile interface and its versions remain independent. That means you can keep a desktop web experience stable while shaping a focused app for phones.
The mobile app is not a screenshot of the website and it is not simply the website squeezed into a phone frame. Build it as an app: use concise navigation, touch-friendly controls, clear loading and offline states, and device features only where they improve the customer’s task.
Example: A field-service product can keep its full scheduling dashboard on the web while the mobile app focuses on today’s jobs, directions, photo capture, signatures, and status updates.
Mango9 builds the dedicated mobile interface, keeps separate mobile versions, prepares immutable build input, and runs native builds from the exact version you approve. Android builds return an installable test package. After you connect Apple Developer, iOS builds return a signed package for testing and App Store delivery. Source download remains available as an optional developer handoff rather than the only path. You continue to own the store accounts, legal agreements, release metadata, device testing, and final submission decision.
Start a mobile app
Open an existing project and choose **Mobile**. The same chat and project context continue, but Build requests from this workspace are scoped to the dedicated mobile app.


Tell Build what a person should accomplish on a phone. Name the first screen, the primary action, the most important data, and whether the app needs iOS, Android, or both.


Open **Mobile setup** and review the generated display name, iOS bundle ID, Android package ID, and platforms. Edit them before store registration if your organization uses a specific naming convention.


Use a common tool in the header or open **View all** for the complete catalog. **Add & use** selects the tool and sends a focused Build request so the interface and behavior are implemented together.


Review both phone frames and the orientations your app supports. Run the mobile security scan, then test device-only behavior on a simulator or physical device before distribution.


Prepare the approved mobile version, then open **Native build**. Choose **Build Android** for an installable test package. For iOS, connect Apple Developer once and choose **Build iOS** for a signed package. Each build stays tied to the exact mobile version and source receipt shown in build history.
A useful first mobile prompt
Build the mobile app for our service technicians. Start with Today’s Jobs, Job Details, photo evidence, directions, and a large Complete Visit action. Use app-style navigation and comfortable touch targets. Keep the existing web dashboard unchanged.
The Mobile Studio
The Mobile Studio keeps the most common tools in the header and the full catalog under View all. iOS and Android switch the visual device frame; Portrait and Landscape change its orientation. Refresh reloads the dedicated mobile interface without changing project files.
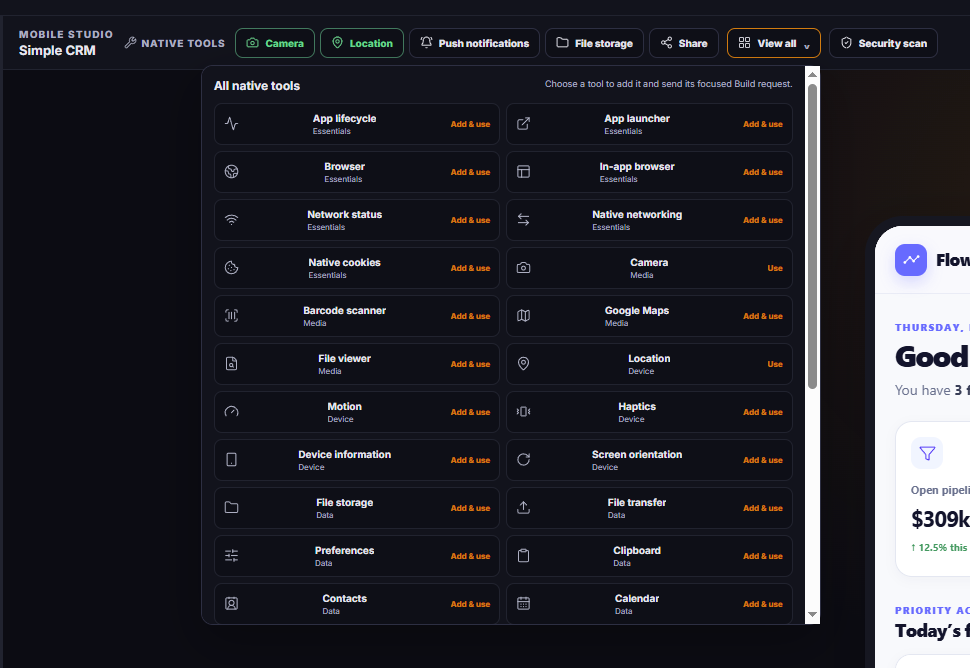
Common tools stay close to the preview. View all opens the complete reviewed catalog without leaving the Mobile Studio.
The version picker belongs to the mobile surface. Restoring a mobile version returns mobile app files without rolling back the web interface, chat, Brief, credentials, database, billing, or project settings. The mobile scan inspects the current mobile source. Findings are advisory and can be sent to Build as focused repairs; they do not silently change the app or block publishing. Choose a frame to review platform-specific proportions and controls. This is a visual preview, not a replacement for running the native source on a simulator or device. Test the orientations the product actually supports. A phone-first workflow may use Portrait only, while maps, media, or field dashboards may need both. Manage the display name, platform identifiers, selected tools, readiness, and immutable build preparation. Source download remains available for teams that also want a local Xcode or Android Studio workflow. Start an asynchronous iOS or Android build from the prepared mobile version, follow its durable status, and download finished artifacts from build history. Native builds do not change the web app or shared project data. Search all 37 reviewed tools by name or category. Choosing a tool prepares a focused request; it does not grant device permission before the customer uses that feature.
What the preview proves
The preview proves the dedicated mobile layout, navigation, content, responsive behavior, and browser-compatible interactions. It is the right place to review information hierarchy, touch targets, empty states, errors, and how the app behaves at phone dimensions.
The preview cannot fully prove device hardware. Camera capture, push delivery, motion sensors, background execution, system bars, and similar behavior must also be tested on the intended operating system. Mango9 should provide a helpful preview fallback instead of pretending a browser has completed a native test.
Example: The preview can show the “Scan code” button, the permission explanation, and the result state. A real device test proves that the camera opens, permission is requested correctly, and a barcode is recognized.
How native tools are added
Native tools are capabilities, not decorative buttons. Select the smallest set needed for the customer’s workflow, then ask Build to connect each capability to a clear user action. The app should explain why a permission is needed before the operating system asks for it, and it should remain understandable when permission is declined.
Use Add & use when the tool is not yet selected. Use Use when it is already part of the project and you want another focused implementation. A selected tool still needs product behavior: screens, buttons, success states, errors, and any required backend endpoint.
Do not request camera, location, contacts, calendar, microphone, or notification permission at first launch merely because the tool exists. Ask when the person chooses the related action, explain the benefit, and provide a safe path when access is denied.
All 37 mobile tools
Essentials
Respond when the app opens, pauses, resumes, receives a deep link, or uses the Android back button. Use it to return someone to the correct screen after a payment, invitation, or notification instead of always restarting at Home. Try: “When the app opens from a job link, take the technician directly to that job and preserve unsaved notes when the app briefly pauses.” Check whether another installed app can handle a URL, then open it deliberately. It is useful for launching maps, phone, email, or a companion app; always show a fallback when the target app is unavailable. Try: “Open the customer address in the installed maps app, but keep a Copy address option if no map app is available.” Open trusted external content in the device’s browser experience. Use it for help centers, legal pages, or an external account flow that should remain visibly separate from the app, and never construct the destination from untrusted input. Try: “Open our privacy policy in the device browser from Settings.” Show approved web content in a contained browser view without making the user leave the mobile app. It works well for a controlled sign-in, hosted checkout, or support article when the return path is clear. Try: “Open the hosted identity check inside the app and return to Verification when it finishes.” Detect whether connectivity is available and respond when it changes. Use it to show an honest offline state, protect submissions, and retry queued work instead of leaving a spinner running forever. Try: “When the technician goes offline, keep draft notes locally and show when they are waiting to sync.” Send app API traffic through the mobile runtime when native request behavior is needed. It does not replace backend authentication, authorization, rate limits, or validation; those protections still belong on the server. Try: “Load assigned jobs from our published API and show a useful retry state for timeouts.” Maintain supported cookie behavior for authenticated app requests. Use secure, server-issued sessions and clear sign-out behavior; do not place passwords, private keys, or permanent tokens in client code. Try: “Keep the signed-in session across approved API calls and clear it completely when the user signs out.”
Media
Capture a new photo or let the person choose an existing image. Ask only after a clear action, compress large files before upload, and preserve a retry path if capture or upload fails. Try: “Let a technician add before-and-after photos to a visit, preview each one, and remove a mistake before saving.” Scan QR codes and supported product barcodes with the camera. Explain what is being scanned, validate the decoded value before using it, and offer manual entry for damaged labels or denied camera access. Try: “Scan an inventory label, confirm the matched item, and let the warehouse user enter the code manually.” Embed and control a native map for locations, markers, and routes. The app owner must provide the appropriate map credentials and configure platform restrictions; a key should never be pasted into chat or exposed without restrictions. Try: “Show today’s service calls on a map and open the selected job details from its marker.” Open a downloaded or local file with a compatible device viewer. Check the file type, display name, and availability first, and give a helpful message when the device has no suitable viewer. Try: “Open the signed work order PDF from the visit record and allow the user to share it.”
Device
Read the device position after an explicit permission request. Collect the minimum precision and frequency the workflow needs, explain background expectations clearly, and allow address entry when location is unavailable. Try: “Use my current location to find nearby jobs only after I tap Near me.” Read accelerometer and device-orientation changes for deliberate interactions. Motion data is noisy and device-dependent, so provide calibration, sensible thresholds, and a non-motion alternative. Try: “Detect a deliberate shake to report a safety incident, then ask for confirmation before sending it.” Provide brief tactile feedback for meaningful actions such as a successful scan, a destructive warning, or a confirmed selection. Haptics should support visual and accessible feedback rather than become the only signal. Try: “Use light feedback when an item is scanned and stronger feedback when the code is rejected.” Read supported details such as operating system, language, device class, and battery information. Use only what the product needs and avoid turning device details into hidden identity tracking. Try: “Include the app version and operating system in a support report after the user approves sending it.” Read, lock, or unlock orientation for a particular experience. Lock only when the task truly depends on it and return to normal behavior when the person leaves that screen. Try: “Keep barcode scanning in Portrait, but allow Landscape on the route map.”
Data
Read, write, copy, and manage files in the app’s permitted native storage. Define retention and cleanup, avoid storing secrets in ordinary files, and make file failures visible. Try: “Save unfinished inspection photos locally and remove them after the server confirms upload.” Upload and download files with progress reporting and cancellation. Validate destinations and file types on the backend, recover from interrupted transfers, and do not call a partial upload complete. Try: “Upload a large site video with progress, Cancel, and Retry without losing the visit form.” Store small key-value choices such as onboarding completion, filters, or display preferences. It is not a database and should not hold credentials, large records, or business data that must synchronize across devices. Try: “Remember the user’s preferred job-list filter on this device.” Copy or read supported clipboard content in response to a clear user action. Treat clipboard data as potentially sensitive and temporary; avoid silent background reads. Try: “Add a Copy confirmation number action and show a short confirmation message.” Access or update device contacts only after explaining the exact benefit and receiving permission. Let the user search or enter a contact manually when access is denied, and avoid copying the address book to a server unnecessarily. Try: “Choose one contact to invite to the project without uploading unrelated contacts.” Find calendars and create or update events with permission. Show the title, time, calendar, and reminder before saving so the person knows what will be added. Try: “Add the confirmed appointment to a calendar selected by the customer.”
Communication
Schedule reminders that the device delivers without a server push. Use them for local deadlines or timers, request permission in context, and let the person manage or cancel reminders. Try: “Offer a reminder 30 minutes before a saved appointment and cancel it if the appointment is removed.” Register the app to receive remote notifications from an authorized backend. This requires Apple or Google notification credentials, device-token lifecycle handling, user preferences, and a safe deep-link destination. Try: “Notify an assigned technician about a new urgent job and open that job when the notification is tapped.” Open the native share sheet for approved text, links, and files. Prepare a clear title and safe content, and check that a local file exists before sharing it. Try: “Share the completed invoice PDF and customer-safe payment link from the invoice screen.”
Interface
Present a native list of short choices near the current task. Keep the list focused, label destructive actions clearly, and include Cancel when dismissing is safe. Try: “From a photo, offer View, Replace, Share, and Delete, with Delete clearly marked.” Display native alerts, confirmations, and simple prompts. Use them sparingly for decisions that deserve interruption; ordinary information belongs in the page. Try: “Confirm before discarding an unsaved inspection and explain what will be lost.” Observe the software keyboard and keep active fields and actions visible as it opens or closes. Test long forms and small phones so the keyboard does not cover Submit, validation, or the current input. Try: “Keep the message composer attached above the keyboard and restore its position when the keyboard closes.” Control the native launch screen while the app starts. Use the approved logo and background, keep the wait short, and transition to a useful loading or error state rather than freezing on the brand. Try: “Show our centered mark during startup, then move directly to the signed-in home or login screen.” Control the top system status area so icons remain readable against the current screen. Test light and dark appearances and avoid hiding important system information without a clear full-screen reason. Try: “Use dark status-bar icons on the light dashboard and light icons on the dark scanner.” Coordinate modern system bars, edge-to-edge layout, and safe areas. Content and touch controls must stay clear of notches, camera areas, home indicators, and system navigation. Try: “Let the map extend edge to edge while keeping search and recenter controls inside safe areas.” Read or adjust the app’s supported text zoom behavior. Preserve accessibility and layout stability; do not force small text merely to keep a card on one line. Try: “Make account details remain usable when the customer increases text size.” Show a brief, non-blocking native confirmation. Use it for low-risk outcomes such as copied or saved, but keep important errors and required decisions visible until addressed. Try: “Show ‘Link copied’ after Share link without interrupting the current screen.”
Advanced
Detect supported assistive technology and announce important dynamic changes. It complements correct labels, focus order, contrast, and keyboard behavior; it does not repair inaccessible screens by itself. Try: “Announce the new scan result and move focus to the result heading without reading the whole page again.” Reduce exposure of sensitive screens in recent-app previews or screen captures where the operating system supports it. Use it for financial, health, or confidential views, and explain any capture restriction that could surprise the user. Try: “Protect the payment-account screen when the app enters the background, but leave public catalog screens visible.” Run bounded work while the app is not in the foreground, subject to strict operating-system limits. Design for delayed or skipped execution and let the server remain authoritative for critical schedules. Try: “Attempt to sync queued field notes in the background, then resume safely the next time the app opens.” Use supported language models directly on compatible devices for carefully bounded features. Hardware support, model availability, download size, speed, and output quality vary, so always provide capability checks and a normal fallback. Try: “Offer an optional on-device summary of a technician’s draft notes and let the user review every word before saving.”
App identity and platforms
Mango9 generates a practical starting identity from the project. The display name is what customers see, while the iOS bundle ID and Android package ID are the permanent technical identities used by operating systems and app stores.
Review those identifiers before creating store records or distributing test builds. Changing an identifier later can make an operating system treat the result as a different app. Use a reverse-domain format such as com.company.product, select only the platforms you intend to maintain, and keep development labels out of the customer-facing display name.
Changing platforms, app identifiers, or selected native tools after preparing the source requires a new preparation. This prevents a download from claiming settings that do not match its native project files.
Versions, security, and recovery
Web and mobile versions are deliberately separate. A mobile restore changes the dedicated mobile source, while a web restore changes the web surface. Shared product state—including the Brief, Memory, conversation, database, credentials, billing, and project settings—does not travel backward with either interface restore.
Run the security scan against the mobile version you intend to compile. Review findings, select focused repairs, send them through normal Build, and run the scan again after a successful version is saved. A scan is evidence about a particular version, not a promise that every future edit remains unchanged.
Example: If a web release needs to return to yesterday’s navigation, restore its web version. The mobile app can stay on today’s approved mobile version and keep its own interface and native tools.
Build native packages
Native build turns an approved mobile version into an installable platform artifact. Mango9 first creates immutable build input from that version, then gives the isolated build service one-time access to that exact input. The build service cannot browse the project VM, choose another version, or reuse the handoff after it expires.
Before building, Mango9 requires a valid app identity and a published HTTPS backend. The generated mobile client calls that published backend; private server credentials, databases, internal project guidance, and the development workspace are not included. Native builds run in the background, so you can leave the page and return to the same durable build receipt.
The mobile client needs a stable HTTPS endpoint. Publish server and database changes before preparing the native build so the package points to an intentional production backend.


Confirm the version picker, preview the main flows, run the mobile security scan, and fix any issue you choose to address.


In **Mobile setup**, prepare the current mobile version. Mango9 validates identity, platforms, selected tools, native project markers, and the exact version before recording its source receipt. Downloading the source is optional.


Open **Native build** and choose **Build Android**. Mango9 sends the immutable version to the Android toolchain, records progress, and returns an installable APK for device testing when the build succeeds.


Create a dedicated App Store Connect API key with the App Manager role, then securely save its Issuer ID, Key ID, and `.p8` private-key file in the Apple Developer integration. Mango9 verifies and encrypts the connection without requesting your Apple ID password.


Return to **Native build** and choose **Build iOS**. Mango9 uses the linked Apple team to obtain the matching distribution signing files and returns a signed IPA when the build succeeds.


Build history shows queued, preparing, building, and final states for the exact mobile version. Refresh the page to renew artifact links, download the package, and test it on the intended devices before any store submission.
Optional source download
Source download is still useful when your own developer wants to inspect the generated platform projects, run Xcode or Android Studio locally, or maintain a separate release process. It is not required for Mango9’s managed native build.
The source package contains the selected platform projects, dedicated mobile UI, locked dependencies, and a build manifest with identity and source hashes. It excludes signing keys, store credentials, project secrets, databases, server code, and the development workspace.
A successful Android build produces an installable test APK. A successful iOS build produces a signed IPA. The current Native build screen does not automatically publish either package to Google Play, TestFlight, or the public App Store. The app owner must complete store records, policies, privacy answers, screenshots, testing, and the final delivery or submission action.
Before distributing an app
- Test sign-in, sign-out, expired sessions, offline recovery, and account switching.
- Test every requested permission when allowed, denied, and later changed in device settings.
- Test on representative physical devices, not only the Mango9 preview.
- Confirm the app icon, launch experience, display name, identifiers, version numbers, and orientation support.
- Verify deep links, notification destinations, external browser returns, and destructive confirmations.
- Keep credentials out of chat and client code; use Mango9’s secure project configuration and the store platform’s approved signing process.
- Provide accurate privacy disclosures, support information, screenshots, and store metadata.
- Treat store acceptance as an external review. A technically valid build is not a guarantee of approval.
Common questions
Does Mobile Studio change my web app?
Mobile Build requests are scoped to the dedicated mobile interface. Web and mobile share product context and backend services, but their UI files and version restores remain separate. State the intended surface clearly when a request affects shared API behavior.
Why does a native tool look incomplete in Preview?
Preview proves the surrounding interface and browser-compatible behavior. Hardware and operating-system behavior must be verified in a simulator or on a physical device. The app should show an honest preview fallback instead of reporting a native success it did not perform.
Why does the prepared version say Refresh needed?
The immutable build input no longer matches the current identity, platform selection, native tools, backend receipt, or mobile version. Review the new state, then prepare it again before starting another native build.
Can Mango9 sign and submit the app for me?
Mango9 can compile an installable Android test APK and, after you connect Apple Developer, create a signed iOS IPA from the approved mobile version. Build status and artifact downloads remain attached to that version in Native build history. Mango9 does not currently press the final TestFlight, Google Play, or public App Store submission action for you. You own the store accounts, legal agreements, listing information, device testing, and release approval.
Do I have to download source before a native build?
No. Prepare the immutable mobile version in Mobile setup, then start the platform build from Native build. Download source only when you want a separate local developer workflow or an additional copy of the generated platform projects.
Do I need all 37 tools?
No. Add the smallest set that proves the product. Every extra permission and device integration adds testing, policy, privacy, and maintenance work, so a focused app is usually stronger than one that requests everything.
Where should API keys and notification credentials go?
Use the project’s secure settings or supported integration flow. Do not paste production secrets into chat, commit them into the mobile source, or place private server credentials in browser-delivered code.
Troubleshooting
Confirm the first mobile build completed and a dedicated mobile route exists. Refresh the preview once; if the build needs attention, read its completion card before retrying. Confirm Mobile setup is enabled, the intended platform is selected, the current mobile version is prepared, the backend is published, and the Builder shows native builds as configured. Connect Apple Developer to this project with a verified App Store Connect API key. Confirm the Apple Developer Program membership is active and the bundle ID belongs to the intended app. Refresh Native build to renew short-lived artifact links. Build history remains durable even when a temporary download link expires. Explain why the feature needs access, keep a manual or reduced-function path, and direct the person to device settings only when the operating system requires it. Verify notification permission, platform credentials, device registration, backend delivery, and the current token. A visible notification button alone does not configure server delivery. Return to Mobile setup and prepare source from the current approved mobile version. Do not distribute an older package under a newer identity. Check native permissions, platform configuration, credentials, device logs, and operating-system support. Preview and native execution prove different parts of the product. Review the selected platforms and test platform-specific behavior, permissions, safe areas, and native configuration. iOS and Android should be verified independently.
A mobile version is ready to build when its focused flows work, selected permissions are understandable, the security report is reviewed, the app identity is final, and the prepared receipt matches the approved version. A native package is ready for distribution review only after its build finishes and the owner tests that exact artifact on representative devices. Store acceptance remains a separate external decision.